.png)
Working with Profiles
 Each transformation in a workflow has source and destination color spaces, in fact, the purpose of most transformations is to change the color space of a file.
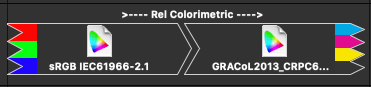
ColorThink represents the source and destination color spaces of a transform using a graphic that shows:
 A simple arrow point - representing Lab or XYZ color,
![]() Or a series of color points - representing device channel colors
Or a series of color points - representing device channel colors
Colors shown on screen are calculated directly from the ink or channel colors in the profile. This communicates the number of device channels and the color differences between different profiles. The CMYK color points of a press profile may appear quite different from the CMYK color points of an inkjet printer.
To assign a profile to an open image or color list either drop the profile onto the Profile Region above the image/list OR open the profile by choosing Replace Profile... from the profile popup menu.
Note:
Only a profile matching the source color space of the image or color list can be assigned to it. For instance, assigning an RGB device profile to an RGB image or color list will work. Assigning a CMYK profile to these will not.
If an image contains Lab data (TIFF files support Lab images) or a color list contains only Lab data then assigning will not work. Lab data is considered the “destination” of a transform so additional profiles will be appended to this transform creating a new transform.
If a color list contains both device and Lab data and the profile matches the device data, ColorThink will prompt you to confirm that you want to replace the Lab data from the file with newly calculated Lab data using the source device data and the profile’s conversion.
To append a profile to a workflow, drag it into the image or color list region of the workflow OR choose it from the Add menu located at the upper right edge of the workflow. If the profile can be logically applied to the end of the workflow ColorThink will create a new transform and assign the profile to it.
ColorThink will accept device, abstract and device link profiles into the worksheet wherever they can logically be applied.
To clarify, if the last transformation in the workflow contains:
Lab data, device and abstract profiles may be applied.
Device data, device and link profiles that match the device space may be applied.
For more information about profile types, please see ColorWiki - The 7 Profile Types
Device Link Profiles
Device Link profiles (DLPs) permanently combine an input profile with an output profile producing a look-up-table (LUT) that translates colors directly from the source to the destination color space in a single profile. In keeping with the nature of DLPs, there are a limited number of ways in which they can be used in ColorThink. Here are a few examples:
DLPs do not have a gamut and therefore cannot be graphed. However, the action that a DLP performs can be graphed (typically using vectors in conjunction with a device profile to create color values from the DLP’s output values)
In the Worksheet, a DLP can be applied to an image or list in the same color space (RGB or CMYK) as the incoming transform of the DLP. For example a CMYK-to-CMYK device link can be applied to the CMYK end of a transform, but not the Lab end of a transform.
Creating Device Link, Abstract and ColorCast Profiles
Creating each of these profile types requires the PrePressPack module (but using any of these profiles in the Worksheet does not): PrePressPack Feature 
 Note: The easiest way to build an Abstract, Device Link, or ColorCast profile is to use the "Create a profile" test in ColorThink’s ColorSmarts Guide.
The link button can be selected (any time it is available) to join a workflow’s profiles together into a device link, abstract or ColorCast™ profile. For more information on these alternate profile types, see ColorThink Pro - Recommended Reading.

The Link icon will join any combination of profiles into a device link profile.
Setting up a Device Link (‘link’) profile
A device link profile is the concatenation (joining) of multiple profiles into one profile that can have any device color space as its source and destination. Any profile combination in a workflow can be linked together to create a device link (ICC designation ‘link’). One advantage of CMYK->CMYK device links is the ability to specify clean blacks where black-only input remains black-only output, overcoming a limitation in typical ICC workflows.
Though any combination of profiles can be linked into a device link, CMYK to CMYK is one of the most common.
To setup a CMYK to CMYK workflow:
Open a new worksheet
Add the first profile to the Worksheet by clicking the Plus “+” button.
Add the second profile into the worksheet in the same way.
Select the desired rendering intent to be encapsulated into the link. Link profiles can only contain a single rendering intent. The default is relative colorimetric.
Note that ColorThink will only create device links of profiles within a single workflow. If you are attempting to create a device link using profiles across multiple workflows in the Worksheet, only the selected workflow will be used.
Abstract Profiles

An abstract profile is a specific case of linked profile where the source and destination color spaces are both Lab. As abstracts contain a Lab->Lab transformation they are typically used to store color edits or effects. Special effects such a sepia tone, grayscale or solarize are great for storing in an abstract profile. Also mechanical effects such as proofing to a specific press can be stored in an abstract.
Why use abstract profiles?
Abstract profiles are useful when you need a certain effect to be put into place in a workflow (for example: lightness boost, sepia tone, hue shift) or if a company wants a certain "look" to be a part of all their work (ie: more saturated skin tones). The abstract profile can capture this effect well, and contain it within a specific profile - rather than being perhaps a series of color adjustments in a program. An abstract profile can only be used in a workflow that accepts Lab to Lab space transformations. Newer versions of Photoshop allow for converting through abstract profiles.
To setup a mechanical proof effect to be linked into an abstract profile:
Open a new worksheet
Use the add button [+] to choose the Lab profile found in ColorThink’s Samples folder
Drag / add a print profile onto the worksheet
Drag / add the profile onto the worksheet a second time. ColorThink will then have a “round trip” setup where the color is converted out to the printer’s device space and back into Lab. This transformation is the same one used in Photoshop’s soft proofing setup.
Device profiles convert from device values (RGB, CMYK, etc) to color values (Lab, YxY, etc) and vice versa. A conversion from color to device values isn’t graphable as Grapher only graphs color. Applying the device profile a second time, to convert the device numbers back to colors is quite useful and the two conversions together are called Round Tripping the color.
A common example is converting some brand colors from their Lab values into CMYK for printing. The CMYK is useful for sending to a press but we won’t know what colors will result until it’s printed. The profile’s “proofing transform” can convert the CMYK values back to Lab color to simulate what the resulting colors will be. Then we compare the initial and final Lab values to calculate error (delta-E) or visualize the error as vectors in the Grapher. The final Lab values are also converted through the monitor profile for display on screen and are graphable in Grapher.
Proofing colors is the process of simulating how color will appear on one device, like a press, using a second device, like an inkjet printer or monitor. The color shifts and different gamut of a slower, more expensive device, can be quickly and accurately shown on a faster, less expensive one - or even free, in the case of your monitor. The round trip from Lab->CMYK->Lab can capture the conversion and proof in one step. This proof simulation can then be embedded into another ICC profile using ColorThink’s ColorCast function. See "Create ColorCast Profile” in the ColorSmarts Guide for more information
Setting up a ColorCast™ profile
(requires the PrePress Pack license added to the Pro-level license)
ColorCast technology is a unique patent-pending CHROMiX invention that performs a specific function to solve a common problem.
Many publishing applications (for example: Photoshop) do not support the use of profiles other than RGB and CMYK for accurately previewing (soft-proofing) the appearance of an image when printed. Many office applications won’t even support CMYK colors or profiles. In order to proof (simulate) profiles containing more than 4 channels (or more than 3 in the case of office applications), expensive plug-ins are required and sometimes there are no plug-in solutions.
ColorCast gets around this problem by embedding the proofing effect of multi-channel profiles into normal RGB or CMYK profiles. These altered profiles can then be used in publishing and office applications to perform proofing and other effects.
Example uses of ColorCast technology:
Embedding a 7-color ECG profile into the Adobe RGB (1998) profile to perform very accurate soft and hard proofing in Photoshop with no plug-ins required. This is effective for the clients of packaging printers, for instance. They can easily proof complex multi-channel printing systems with nothing more than a “normal” RGB ICC profile.
Embedding a GRACoL™ CMYK profile into an RGB Epson printer profile so each time the profile is used, it proofs GRACoL press color even from within office applications such as MS Word.
Embedding an abstract profile containing a special effect into a digital camera input profile so the effect is available whenever the profile is selected.
Embedding an abstract profile containing a special effect into a working space profile (such as sRGB or Adobe RGB (1998)). The effect of the abstract profile can then be applied any time in Photoshop even though Photoshop does not support abstract profiles.
An important point to emphasize is that ColorCast profiles are not device link profiles. Outwardly, they are normal ICC device profiles. Wherever a device profile can be used, a ColorCast profile can take its place, adding proofing functions or special effects.
Also, ColorThink will not allow the creation of profiles with the names sRGB, Adobe RGB (1998) and other standard working spaces. Creating effect profiles that share the names of popular standard working spaces would wreak havoc on the graphics and print industries. Please give your new profiles descriptive names that cannot be confused with popular RGB and CMYK profiles.
Note: The easiest way to build a ColorCast profile is to use the "Create a profile" feature in ColorThink’s ColorSmarts Guide.

ColorCast workflow
For completeness, here are instructions for "manually" creating a ColorCast profile in the Worksheet:
To setup the worksheet for creating a ColorCast profile:
Open a new worksheet
Drag the Lab profile found in ColorThink’s Favorites folder into the worksheet
Drag / add a print profile onto the worksheet
Drag / add the profile onto the worksheet a second time. ColorThink will then have a “round trip” setup where the color is converted out to the printer’s device space and back into Lab. This transformation is the same one used in Photoshop’s soft proofing setup.
Drag / add the destination profile you want the proofing effect embedded into. A few examples include the sRGB or Adobe RGB (1998) profiles or an inkjet printer profile.
Creating the profile
When you have the workflow profiles setup as desired (as described in the above sections) click on the ![]() Link button in the Profiles region.
Link button in the Profiles region.
The Profile Linker dialog will appear with the following information and options:
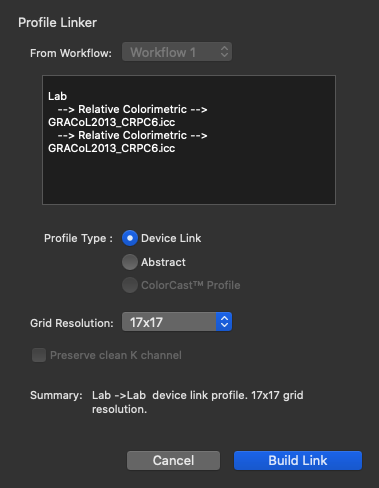
If your worksheet has multiple workflows, select the workflow you wish to link in this popup menu.
Each profile and rendering intent in the selected workflow is summarized for your review. If you notice a rendering intent or profile is not as it should be, close the Profile Linker window to return to the worksheet and make any necessary alterations.
As described in the above sections, the Profile Linker can create Device Link, Abstract and ColorCast profiles. (ColorThink requires additional licensing to enable the ability to build ColorCast profiles.)
The Device Link option is available when the workflow begins and ends in device spaces. In order for the Abstract option to be available, the selected workflow must begin and end with the Lab or XYZ colorspace. The ColorCast option will be available if the workflow begins with Lab and ends in a device space with a normal ICC device profile.
Most ICC profiles store their color transformation information inside multi-dimensional lookup tables (LUTs). The spacing of entries in these tables can affect the accuracy and smoothness of the profile as well as contribute significantly to its size. We recommend 17x17 for CMYK->CMYK device links and 25x25 or 33x33 for RGB links, abstract or ColorCast profiles.
If you find your profiles are lacking accuracy, try increasing the grid resolution. If they are lacking smoothness, try decreasing it.
Enable Preserve clean K channel option can be enabled in the special case of the selected workflow starting and ending with CMYK.
A typical ICC device link will convert K-only color input into Lab and then allow the output profile to convert the Lab values into 4-color blacks. Though the existence of Lab values disappears in a device link profile, this re-separation effect remains. If this is undesired, select the ‘preserve clean K channel’ option.
With this option selected ColorThink will create a device link profile that has been altered to allow K-only input colors to pass through as tone-adjusted K-only output colors. The tone adjustment is due to the output profile’s K tone curve differing from the input profile’s. This means a 50% K input value may become a 45% K output value. The visual tone level of the black will remain the same however, exactly as the application of the two profiles should create.
Create the Profile
Click the ‘Build Link’ button to name and save the profile. ColorThink will not allow the saving of a profile with sRGB, Adobe RGB (1998) or other standard profiles as its name. Please give your new profiles descriptive names that cannot be confused with popular RGB and CMYK profiles.
Note: The easiest way to build a ColorCast profile is to use the "Create a profile" feature in ColorThink’s ColorSmarts Guide..